How to Repair a Vacuum Cleaner ?

The day has come, the day when our favorite vacuum cleaner got broke and we have no idea what to do now.
Just like any product that the human being made, vacuum cleaners aren’t any different, and unfortunately they will break at some point. When it will happen, most of us won’t know what to do, how do we repair our vacuum cleaner, and is it even possible without buying a new one?
Well put the worries aside (at least for now) as in this guide you would be able to get all the tips and the methods on how to repair vacuum cleaner, without calling an expert, or pushing our hand to get our wallet and spend few hundred bucks for a new vacuum cleaner.
So should we start? Let’s get to know better how to repair vacuum cleaner!
How to Repair Vacuum Cleaner – I’m Ready!
Before diving into how we repair vacuum cleaner, we should fully understand in front what we face. To do so, we need go through the basics of vacuum cleaner. Some of the information that is going to be presented now is probably known for anyone, and pretty obvious, but as already mentioned before, we need to understand where we stand.
The vacuum cleaner is a device that using air pump to suck up dust and dirt. This revolutionary product is here for more than 100 years already, and it went through many changes. Today in the market there are different types of vacuums including upright vacuum cleaner, canister, handheld and the most recent one the robotic vacuum cleaner, when each type of vacuum has its own strong unique points. To produce all the different types of vacuum cleaners, there are dozens of vacuum brands in the market, including Hoover, Electrolux, iRobot, Dyson and many more. Each vacuum brand has it arms in the different types of vacuum cleaners, but each has its own specialty in one specific type.
This short recap of vacuum cleaners background might be seen as useless to some people, or too obvious, but in fact we need all of this information to know how to repair vacuum cleaner. Now that everything settled down and we checked that we know the background of vacuum cleaners, we now can really start the guide.
First Step: Detect the Problem
Once again we go one step behind the scenes. Before getting to the hard and dirty work, we need to understand what our problem is. What exactly is needed to be repaired or fixed in the vacuum cleaner? Does the vacuum barely have any suction power? Or it doesn’t work at all?
To detect the problem we would need to inspect the vacuum cleaner. I would recommend getting one small piece of paper and pen to write down short points of what we find.

vacuum
- First, write down what you know about the vacuum. What brand and type of vacuum it is. If you’re not sure what kind of vacuum cleaner you own you can use the following guide:
- Now plug in the vacuum cleaner and turn on the vacuum. If it doesn’t work here write it down, as it might be the main problem. If you own robotic vacuum or any other vacuum cleaner that might has extra buttons with light, check if the lights are working. When the vacuum doesn’t suck nor does any sound, it’s a different problem if other functions in the vacuum (like the light) are working.
- Carefully check for any odd sound, smell or anything that isn’t usual for the vacuum cleaner you own. If the noise is too loud or you see/smell any smoke immediately turn off the vacuum cleaner. We don’t want to burn the vacuum and obviously not hurt anyone. Be careful.
- If the problem isn’t any of the above, try to use the vacuum cleaner now just like you would normally use it. Try to use it on different surfaces such as hard floor and rug. Also try to use it in unusual places and methods, to test the limits of the vacuum cleaner. When the vacuum is used in all the possible ways we can easily detect a problem. So, does the vacuum suction power is less then you remembered it? Or it doesn’t reach under the bed like it used to? Write anything you saw at this step which was different.
- Sum up what you found so far and get ready to repair the vacuum cleaner. Some problems might be too difficult for non-experts to fix, so think carefully if the points that written on the piece of paper are something you can deal with it? Well, if the paper is empty, then the vacuum cleaner might be working just fine of course.
Now that we have found our problem, we can go one step forward in our guide of how to repair vacuum cleaner.
Step Two: The Vacuum Cleaner Repair – Pre-repairing
After finding the problems of the vacuum cleaner, we can start to repair the vacuum. There is one simple way to fix 90% of the problems that accrues – maintenance. Maintenance! Maintenance is the highest priority in every product we have, especially when it comes to electronic devices. Maintaining the vacuum cleaner can save spending a lot of time and money in the future, and some of the current vacuum cleaner problems.
how to repair vacuum cleaner
- Bags – If you own a vacuum cleaner using bags, replace the bags frequently. Don’t wait for the time it would be full and about to explode. The bag is the storage room for all the dust, but it isn’t a prison. It can’t keep the dust on 100%. Many times the dust “leaves” the bag if there are holes in the bag, or simply because it goes up the hose. Therefore replace the bag, and clean the area, including the hose and other parts of the vacuum cleaner.
- Cable – The cable is what gives the power for the vacuum cleaner. If the cable doesn’t get the right electricity, or can’t deliver it, the vacuum won’t work. Check if the electrical outlet is working and if the cable doesn’t have any cuts anywhere. Even the small rip can stop the vacuum from working.
- Battery – Some vacuum cleaners, such as the handheld and the robotic one uses batteries. It’s the same as the cable for upright and canister vacuum cleaners. If the battery is drained, or damaged, the vacuum won’t work. Therefore try to fill the battery, and if possible to take out the battery and check for any damages on the battery. You might need to change the battery, but at least not the entire vacuum cleaner.
- Overheat – One of the less common problems, yet the most hard to detect is the overheat issue. All the devices have a point where they overheat and automatically stop to work. You can get the full information of the overheat point in the vacuum cleaner manual you get or sometimes on the vacuum itself. To fix the overheat issue all you have to do is wait. The vacuum cleaner needs time to cool down from the hard work. Don’t try to put water on it to cool it down of course…
- Body – The vacuum cleaner is made of many parts and each has its own potential to break down and affect the entire vacuum cleaner, just like the human body. When your leg or hand breaks, it’s harder for you to the same work you did before, because you lose the support you had. Same goes to the vacuum cleaner. Check the outside of the vacuum cleaner, is something broken? How about the wheels or the brush roll? Does it look normal? And how about some missing bolts?
- Filter – These days vacuum cleaners has filter built in, if not 2 filters, from small robotic one to large central vacuum cleaners. The filter does the entire dirty job inside the vacuum. When the filter is too dirty it can affect the entire work of the vacuum cleaner, including the suction power. Cleaning the filter isn’t complicated, and it can do a lot good.
Step Three: The Vacuum Cleaner Repair – Repair the Vacuum
If the problem isn’t fixed it by maintaining right the vacuum cleaner then the problem is a little more complicated. What it means that now the problem is needed to be fixed by hands, using tools, and send our vacuum cleaner to the surgery room, opening it inside. Each problem needs different tools, amount of time and knowledge. Some might be too complicated for the average vacuum cleaner owners, and it might be better to take the service of an expert. Yet, there are quite of few major problems that you can fix yourself.
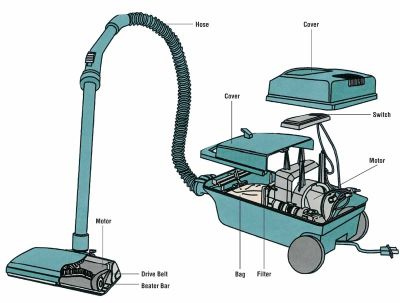
inside of a canister
The king of problems is the loss of suction power. The problem happens because of various issues, some which we already covered above (dirt). What most of people don’t understand is the suction loss happens because of other problems in the vacuum cleaner. If the vacuum lost it suction, the core of the issue can also be the reason why it does odd noises, or why there is smoke coming out of the vacuum cleaner. In other words, the suction power can be the only problem or followed by other problems as well, and all can be fixed.
As we want to do it on our own, and it’s possible, each issue will be including a video of how to repair, so make sure to check it out.
- Belt – Some vacuum cleaners, especially the upright one, has belt that drive the brush roll in the bottom part of the vacuum cleaner. Just like in bicycles, if the belt is loosen or ripped, it can do crazy stuff, including strong loud noises. Thankfully the belt isn’t placed in deep place inside the vacuum and can be out and checked by anyone with the simplest tools.
- Piled up dust – Piled up dust is one of the main reasons for suction loss of power. The dust piling in the airways, covering it and in the end the vacuum airway get blocked which makes the airflow less strong – the suction power is bad. Cleaning the dust is quite simple as small wipe in the dusty places will fix the problem, the hard part is getting to those places. The dust can be piled up in the hose, the filter and basically every inner place of the vacuum cleaner. The dust is mean enemy, as not it can affect the suction power but it also can make the vacuum cleaner overheat.
There are many methods to clean the dust, but the most useful one is to open up the vacuum cleaner. It isn’t hard mission, but need to be careful. The following video is the best you can find as it shows how to clean the dust from all the possible places in the vacuum.
- Electricity – Just like the belt, or other parts of the vacuums, the electric wires can break or rip. Sometimes the wires are just fine but the “brain” of it all is broken. Although there are many guides on how to fix it I wouldn’t recommended touching it, if you don’t know what you’re doing of course. Playing with electricity, and sensitive problems should be a work of expert, our next step.
Related:
check out best vacuum cleaner under 200 dollars miniwick.com/best-vacuum-under-200/
Step Four: I Can’t Fix it!
We tried, but couldn’t find the problem or fix it by maintaining or cleaning the airways of the vacuum cleaner. Now what? Now it’s time to pass the headache to an expert. When the problem is too complicated, or risky for normal owner of vacuum cleaner, then we should call an expert that will help us. Yet! Before picking up the phone and opening the wallet, there are few things you still can do to save money, and some other tips.
- Warranty – Vacuum cleaners comes with warranty, just like any other electric product. The warranty usually goes from 1 year until 6 years or more, when the average is around 2 years. It all depends when and where you bought the vacuum cleaner. Look for your warranty you received when you bought the vacuum cleaner and what it offers. If you found the warranty in time and it still available, follow the instructions there and connect the right people according to what is written in there.
- Service Center – If the warranty is out dated already or you can’t find it, your next choice is service center. Before approaching anyone else you should check your vacuum cleaner brand site. All the brands has few service centers, where you can get the help you need for your vacuum cleaner. Getting the repair from the brand is the best, as they know their products the best. An example: Hoover site locator.
- Repair Shops – Now when you tried everything, including repairing it yourself, and getting help from the official brand, your choice is going to the local repair shop. It’s highly recommended to go to a shop that specialize in repairing vacuum cleaners and not generally for electronic products, but both can work. There are quite of few options to find these kind of shops, but the best option is to find the store using google. Just type in vacuum cleaner repair, and your city/town/street and google will find you the best and closet shops to you. An example: Vacuum Cleaner Repair Las Vegas
Step Five: Doctor… is it the End?
Well… if you are in step five, and nothing helped you or you just don’t want to repair the vacuum cleaner, then I guess it is the end. The end for your vacuum cleaner, but not the end for you! When the vacuum cleaners breaks down, it’s a great time to think with yourself “maybe it’s a time to get a new vacuum?”. Today there are plenty of great vacuum cleaners out there in the market, all has various incredible features, comes in various sizes, colors and price. Getting new vacuum is actually nice gift to yourself isn’t it? Maybe you even should get the new gadget called robotic vacuum cleaner? The options are in front of you, and the mission isn’t as hard as it seems. You can use the following guide to get more help on picking the best vacuum cleaner for you: Vacuum Cleaner Buying Guide.
That it for today! I hope you found great success when trying to repair your vacuum cleaner, and that it won’t break anymore! Even if you didn’t, that means its time for new start in your life with a brand new vacuum cleaner, isn’t it?
I hope I was helpful for you today, and feel free to leave comments of any kind.
